
- You can quickly delete temp files in Windows 11 to make the PC run faster.
- The methods to clean the temporary files includes deleting the files from Settings and also using %temp% run command.
Performance plays a significant role in any device’s overall experience. Many users like or dislike a device solely based on its performance. And why wouldn’t they? If a computer doesn’t have good performance, it lacks many things. It might slow down your work. It wouldn’t be able to run new, advanced software. It may even crash while you’re working on it just if it isn’t too good with the performance. It’s not necessary for our devices to give such extraordinary performance which can run the most hardcore action game with ultra graphics, but we can at least expect a smooth, clean working experience…right?
So, just to get that smooth and clean working experience, many users tend to boost their computer’s performance by using several methods. Some of them are really effective and some might even be bluffs. Here, we’re gonna tell you about one of the most effective and absolute ways to make your Windows 11 device much faster and smoother.
We all know that if our device’s storage is filled too much, it might start lagging a bit. The lagging would be worse if the device doesn’t have a decent processor, good RAM, and a better storage type. So, we usually delete the unnecessary files which are gathered in our devices and keep clotting space in the memory for no reason. Those files are one of the major reasons for the sluggish performance of our computers. Moreover, sometimes there are these certain files in our devices which we’re never gonna use and their existence just creates more problems. Such files are known as Temporary Files. Hence, it’d be better to delete those files as soon as possible so that our computers can be at their prime, all the time.
How to Delete Temp files in Windows 11
First, we’d need to learn which files are temporary files so we can eliminate the risk of deleting any important ones. We’ve listed all the temporary files which are commonly found in our computers. So make sure to delete them and not anything important. This is the list along with a detailed explanation of every temporary file.
- Temporary App Files: There are many instances where the apps which we use for our daily work, end up creating many files on our computer. These files are required for the completion of certain tasks and usually, these files are deleted by the apps themselves. Though rarely, the apps might not delete those files. So, you can manually delete them.
- Temporary Internet Files: Whenever you use Microsoft Edge for surfing the internet, it creates some files on your Windows computer which helps in loading those sites faster when you visit them the next time. These files might not be required and can be deleted. Though it doesn’t matter how many times you delete them, your browser will keep creating them again and again.
- Windows Update Cleanup: These files are stored in your computers since your last update of Windows. You can use these files to revert back to the previous version if you have any problems with the newer one. If not, then you can surely delete them.
- Windows ESD Installation Files: Though these too are temporary files, we’d recommend not to delete them. They are used to reset the windows and usually take a lot of storage space. But deleting them might cause trouble for you in the near future.
- Windows Upgrade Log Files: These files too can be deleted or not based on your experience with the current version of Windows that you’re using. They’re present in your computer to troubleshoot any issues during the installation or servicing of Windows. You can delete them if your current version of Windows works fine.
- Thumbnails: All of the photos, videos, and different kinds of files have their thumbnails which help us to identify them. Windows usually save these thumbnails in order to load them faster when you browse through those files the next time. So, it’s completely safe to delete these files because Windows will keep creating them over and over again.
- Device Driver Packages: After the newest update, the old drivers of your computer are deleted but after leaving their copies behind, just for backup. If you’re comfortable with the current drivers, then feel free to delete the copies.
- Microsoft Defender Antivirus: These files are usually kept on your device by Windows and used by Microsoft Defender. You can delete them as their deletion won’t affect your computer in any way.
Hence, we’re sure that after going through the list, you’ll get an idea of which files to delete and which to skip.
Now, these temporary files can be deleted by various methods and some of them are described below:-
1. Deleting Temporary files through settings:
- Press ‘Windows + X’ on your keyboard or right-click on the Start icon. Choose ‘Settings’ among the options that appear. or You can simply get to the Settings App by pressing ‘Windows + I’.
- Now, get to the ‘System’ tab of the Settings App.
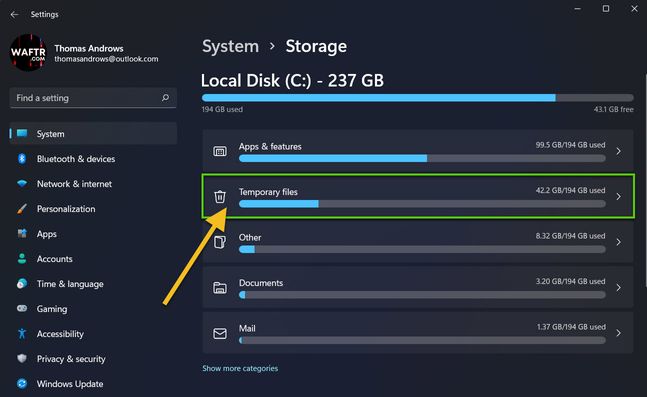
- On the right side, you’ll find ‘Storage’. Click on it.
- Windows will then calculate and show you the amount of storage space taken by different sections or files. Among all the options, select ‘Temporary Files’. Now just as we mentioned earlier, you’ll have to differentiate between the files which need to be deleted and the ones to be kept.

- Select all the files which are safe to delete and deselect those which shouldn’t be deleted.
- Click on ‘Remove Files’ and those temporary files would be deleted.

You can also see the amount of storage cleared after deleting those temporary files.
This method can delete temporary files for you but not every single one which is present on your computer. So for that purpose, here’s another method to delete all the temporary files on Windows 11:
2. Steps to Delete temporary files in Temp folder
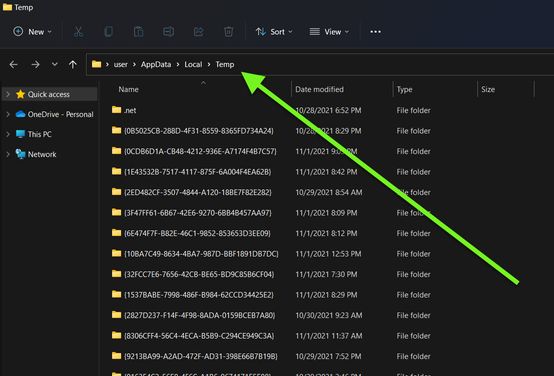
- Press ‘Windows + R’ on your device’s keyboard to start the ‘Run’ command.
- Inside the search box, type ‘%temp%’ or you can even copy and paste it.

- Press the ‘enter’ key or click on ‘OK’.
- Now select all the files present on your screen. You can do it either with the help of your mouse/cursor pad or press ‘CTRL + A’.
- After selecting all the files, right click on them.

- Select ‘Delete’ from the various options provided in the context menu. If you down want the files to get saved in the recycle bin, just hold Shift key and press delete key after selecting the files.

Now all of the Temporary files which were previously taking unnecessary storage space on your device are deleted.
Ready to delete Temp Files in Windows 11?
This would greatly boost the overall performance of your Windows device. Though this is a great process for making your device better and faster, not taking proper precautions would be a fatal blow to your workspace. Therefore, be sure to double-check the files before deleting them just according to the list of temporary files we provided. It’d be really problematic if you end up deleting something important for your Windows device.
Anyways, we’re always here to help. So you can ask any questions regarding the same and we’d be there for you.